As the temperatures rise and the sun shines brighter, there’s nothing quite as refreshing as a homemade popsicle to cool off. In the realm of frozen treats, homemade popsicles stand out for their ability to deliver both flavor and health benefits, making them a popular choice for families and individuals alike. Among these delightful creations, Zesty Lemon Yogurt Popsicles shine brightly, offering a perfect balance of tartness and creaminess that is hard to resist. The combination of vibrant lemon and silky Greek yogurt not only tantalizes the taste buds but also provides a nourishing option compared to their store-bought counterparts.
These popsicles are not just delicious; they are also packed with nutrients, making them an ideal choice for health-conscious individuals. By using Greek yogurt as the base, you’re treating your body to a dose of protein, calcium, and probiotics. Plus, the natural sweetness derived from honey or maple syrup ensures that you can enjoy a guilt-free dessert that doesn’t compromise on flavor. Whether you’re lounging by the pool, hosting a summer barbecue, or simply looking for a cool treat on a hot day, these popsicles are sure to delight.
Understanding the Ingredients
The magic of Zesty Lemon Yogurt Popsicles lies in their simple yet flavorful ingredients. Each component plays a crucial role in creating a harmonious blend that results in a creamy, tangy, and refreshing treat. Let’s take a closer look at the key ingredients that make these popsicles not only delicious but also nutritious.
Greek Yogurt: At the heart of this recipe is Greek yogurt, which is thicker and creamier than regular yogurt. This ingredient not only adds a rich texture but also boosts the nutritional profile of the popsicles. Greek yogurt is known for its high protein content, making it an excellent choice for those looking to increase their protein intake. Additionally, it contains probiotics that support gut health and can aid in digestion.
Lemon Juice and Zest: Fresh lemons are the stars of this recipe, providing a zesty brightness that elevates the overall flavor. The juice offers a tangy punch, while the zest adds aromatic oils that enhance the lemony essence. Lemons are also a great source of vitamin C, which is vital for a healthy immune system and skin health.
Sweeteners: To balance the tartness of the lemon, sweeteners like honey or maple syrup are incorporated. Both options are natural, healthier alternatives to refined sugar and bring their unique flavors to the popsicles. Honey is known for its antioxidant properties, while maple syrup contains essential minerals like manganese and zinc.
Selecting the Right Ingredients
Selecting high-quality ingredients is crucial for achieving the best flavor and texture in your Zesty Lemon Yogurt Popsicles. Here are some tips to ensure you choose the best components for your creation:
Fresh Lemons: Opt for organic lemons whenever possible. Organic produce is cultivated without harmful pesticides and is often fresher, leading to a more vibrant flavor. When selecting lemons, look for ones that are firm and heavy for their size, as this usually indicates juiciness.
Local Honey or Maple Syrup: Support local businesses by sourcing honey or maple syrup from local producers. Local honey can also help with seasonal allergies, and its unique flavor will enhance your popsicles. If you prefer maple syrup, choose pure maple syrup over imitation varieties for a richer taste.
Fresh Berries: While the base recipe focuses on lemon, consider customizing your popsicles with fresh berries like strawberries, blueberries, or raspberries. These fruits not only add a burst of color but also contribute additional nutrients and antioxidants. Berries are known for their high fiber content and low-calorie count, making them an excellent addition to your frozen treats.
Step-by-Step Guide to Making Zesty Lemon Yogurt Popsicles
Creating Zesty Lemon Yogurt Popsicles is a straightforward process that anyone can master. Below is a detailed walkthrough of the recipe, ensuring clarity and ease for readers.
Preparing the Yogurt Mixture
1. Gather Your Ingredients: Before you start making the popsicles, make sure you have all your ingredients ready. You will need Greek yogurt, fresh lemon juice, lemon zest, and your choice of sweetener (honey or maple syrup).
2. Combine the Ingredients: In a mixing bowl, combine the Greek yogurt, fresh lemon juice, lemon zest, and sweetener. Start with a modest amount of sweetener, as you can always adjust later.
3. Blend for Smoothness: Using a whisk or an electric mixer, blend the mixture until it is smooth and creamy. The goal is to achieve a consistency that is easy to pour into molds, so take your time to ensure all ingredients are well incorporated.
4. Taste and Adjust: Once you have a smooth mixture, take a moment to taste it. This is your opportunity to adjust the sweetness and tartness to your liking. If you prefer a sweeter popsicle, add more honey or maple syrup, mixing it in thoroughly.
Adjusting Sweetness to Personal Preference
The beauty of making your own popsicles lies in the ability to customize them to suit your taste. Each individual has different preferences when it comes to sweetness, so don’t hesitate to experiment. Here are some tips for adjusting sweetness:
– Start Small: When adding sweeteners, start with a small amount and gradually increase it until you reach your desired level of sweetness. This method prevents over-sweetening and allows you to enjoy the refreshing tartness of the lemon.
– Consider Flavor Profiles: Different sweeteners can impart unique flavors. Honey adds floral notes, while maple syrup provides a deep, caramel-like sweetness. Think about what flavor complements the lemon best and adjust accordingly.
– Mixing Sweeteners: For a more complex flavor, consider blending sweeteners. For instance, using a combination of honey and maple syrup can create a richer taste while maintaining natural sweetness.
Enhancing Flavor with Fresh Berries
To take your Zesty Lemon Yogurt Popsicles to the next level, consider incorporating fresh berries. Here’s how you can enhance the flavor and visual appeal:
– Choose Your Berries: Select your favorite berries like strawberries, blueberries, or raspberries. Fresh berries not only add a pop of color but also provide additional vitamins and antioxidants.
– Prepare the Berries: Wash and chop the berries into small pieces. If you’re using strawberries, remove the green tops and slice them into smaller chunks to ensure even distribution throughout the popsicles.
– Incorporate into the Mixture: Gently fold the chopped berries into the yogurt mixture. Be careful not to over-mix, as you want to maintain the integrity of the berries while ensuring they are evenly spread throughout the popsicle mixture.
– Layering for Visual Appeal: If you want to create a visually stunning effect, consider layering your yogurt mixture and berries in the popsicle molds. Start with a layer of yogurt, then add a layer of berries, followed by more yogurt. This layering technique results in beautiful, striped popsicles that are as appealing to the eyes as they are to the palate.
Stay tuned for the continuation of this recipe, where we will explore the next steps in the popsicle-making process, including pouring into molds, freezing, and enjoying your homemade Zesty Lemon Yogurt Popsicles. With every step, you will be one step closer to enjoying this delightful and refreshing treat!
{{image_2}}
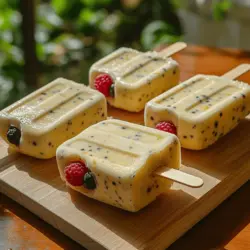
Incorporating Berries into the Yogurt Mixture
Adding berries to your Zesty Lemon Yogurt Popsicles not only enhances the flavor but also introduces vibrant colors that make these treats visually appealing. When selecting berries, consider options like blueberries, strawberries, raspberries, and blackberries. Each type brings its unique sweetness and tartness, complementing the zesty lemon flavor beautifully.
To incorporate the berries, start by washing them thoroughly and patting them dry. For larger fruits, like strawberries, slice them into smaller pieces so they can distribute evenly throughout the yogurt mixture. If you prefer a smoother texture, you can mash the berries slightly before mixing them in—this will release their juices and create a marbled effect in the popsicles. Aim for a mix of whole and crushed berries to provide a delightful surprise with each bite.
Once the yogurt mixture is ready, gently fold the berries in using a spatula. Be careful not to overmix; you want to maintain some of the berry chunks for texture and visual appeal. The result should be a creamy mixture dotted with colorful berries, ready to be transformed into delicious popsicles.
Filling the Molds
Now that your yogurt and berry mixture is complete, it’s time to fill your molds. Start by ensuring your popsicle molds are clean and dry. Using a ladle or a measuring cup, carefully pour the yogurt-berry mixture into each mold. Leave about half an inch of space at the top of each mold to allow for expansion as the mixture freezes. This is crucial, as overfilling can lead to spills and messy popsicles.
To ensure even distribution, fill each mold slightly before going back to top them off. This way, you can adjust the amounts and ensure that each popsicle has a similar quantity of berries. If you’re using molds with intricate designs, make sure to tap the molds gently on the counter after filling to eliminate any air bubbles, which can create unwanted gaps in your popsicles.
Inserting Sticks and Freezing Process
Once your molds are filled, it’s time to insert the sticks. If your molds come with lids that hold the sticks in place, simply assemble them according to the manufacturer’s instructions. Otherwise, insert the sticks into the center of each mold, ensuring they are straight and centered. This will help maintain the popsicle’s shape as they freeze.
The freezing process is crucial for achieving the perfect texture. Place the filled molds in the freezer and allow them to freeze for at least 4 to 6 hours, or until solid. If you’re in a hurry, you can freeze them for a shorter period, but be aware that the texture may not be as creamy. To check if they are ready, gently wiggle the sticks; if they feel firm and do not move, your popsicles are ready to be removed.
Removing and Serving the Popsicles
Removing popsicles from the molds can sometimes be tricky, but with the right technique, you can prevent any damage. Start by running warm water over the outside of the molds for a few seconds. This will slightly melt the outer layer of the popsicles, making them easier to release. If necessary, gently wiggle the sticks to loosen the popsicles before pulling them out.
For an eye-catching presentation, consider serving your popsicles on colorful plates or in clear cups. You can even garnish them with additional berries or a sprinkle of grated lemon zest for an extra touch. This not only enhances the visual appeal but also invites others to indulge in your delicious, homemade treat.
Nutritional Benefits of Zesty Lemon Yogurt Popsicles
Zesty Lemon Yogurt Popsicles are not just a tasty treat; they also provide numerous nutritional benefits. Greek yogurt serves as the base for these popsicles, offering a substantial amount of protein, which is essential for muscle repair and growth. The probiotics found in yogurt contribute to gut health, making these popsicles a smart choice for a refreshing snack.
Lemons are rich in vitamin C, an antioxidant that supports the immune system and promotes healthy skin. The addition of berries not only enhances the flavor but also packs in a variety of essential vitamins and antioxidants. Blueberries, for example, are known for their high levels of antioxidants, which can help combat oxidative stress in the body.
Together, these ingredients create a balanced treat that can fit into a healthy diet. Whether enjoyed as a post-workout snack, a refreshing afternoon treat, or a guilt-free dessert, these popsicles are a delightful way to satisfy your sweet tooth while nourishing your body.
Creative Variations and Customizations
The beauty of homemade popsicles lies in their versatility. While the Zesty Lemon Yogurt Popsicles are delicious as is, there are countless ways to customize them according to your preferences. Consider experimenting with different citrus fruits such as lime or orange, each bringing its unique zest and flavor profile.
You can also incorporate spices like ginger or cinnamon to add warmth and complexity to the flavor. For an exotic twist, try adding tropical fruits such as mango or pineapple, which pair beautifully with the tangy lemon yogurt base. If you’re feeling adventurous, mix in a touch of honey or maple syrup for added sweetness.
For those who enjoy a bit of crunch, consider folding in some granola or crushed nuts before freezing. This not only adds texture but also boosts the nutritional value. The possibilities are endless, allowing you to create a popsicle that’s uniquely yours.
Conclusion: The Joy of Homemade Popsicles
Making Zesty Lemon Yogurt Popsicles at home is a delightful and rewarding experience. The joy of creating a refreshing treat that is both healthy and customizable cannot be overstated. Not only do these popsicles satisfy your cravings for something sweet, but they also provide a nutritious snack option that you can feel good about sharing with family and friends.
Homemade popsicles offer the freedom to experiment with flavors and ingredients, making them a perfect activity for hot summer days or family gatherings. As you enjoy the zesty, berry-filled goodness of your homemade popsicles, you’ll appreciate the simple pleasure of crafting delicious treats that bring smiles to everyone’s faces. So gather your ingredients, get creative, and savor every moment of this delightful culinary adventure.