Go Back
Beef Stroganoff, a classic dish that has graced dining tables around the world, boasts a rich history dating back to 19th-century Russia. Named after the Stroganov family, affluent merchants who were known for their culinary contributions, this dish has evolved over the years into various interpretations, each showcasing tender pieces of beef enveloped in a velvety sauce. While its origins may lie in the opulent kitchens of Russian nobility, today, Beef Stroganoff is a beloved comfort food that resonates with many cultures, making it a staple in family recipes and restaurant menus alike.

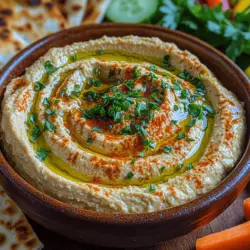
Creamy Roasted Garlic Hummus

Discover the rich history and comforting flavors of homemade Beef Stroganoff in this ultimate guide. From selecting the perfect cuts of beef and fresh mushrooms to mastering a creamy sauce, this recipe ensures a satisfying meal that can be customized to your taste. Learn essential techniques for tender beef, explore various serving options, and find out how to add your own twist for a unique dining experience. Perfect for both novice and seasoned cooks, indulge in the timeless delight of this classic dish.

Ingredients
  

1 cup canned chickpeas, drained and rinsed

4 cloves of garlic

2 tablespoons tahini

2 tablespoons extra virgin olive oil

3 tablespoons fresh lemon juice

1 teaspoon ground cumin

Salt, to taste

2-4 tablespoons water (adjust as needed for consistency)

Fresh herbs (such as parsley), and paprika, for garnish

Instructions
 

Roast the Garlic: Begin by preheating your oven to 400°F (200°C). Take the garlic cloves and wrap them in aluminum foil, drizzling a small amount of olive oil over them. Place the wrapped garlic in the oven and roast for 20-25 minutes, or until the cloves are soft and aromatic. Once roasted, allow them to cool for a few minutes, then gently squeeze to extract the soft garlic from their skins.

    Blend the Ingredients: In a food processor, add the drained chickpeas, the roasted garlic (peeled), tahini, olive oil, fresh lemon juice, ground cumin, and a pinch of salt. Blend the ingredients on medium speed until the mixture becomes smooth and creamy.

      Adjust Consistency: While blending, carefully add water one tablespoon at a time. Continue blending until the hummus reaches your desired creamy texture. Don’t forget to pause and scrape down the sides of the bowl as needed to ensure even mixing.

        Taste and Adjust: After achieving the right consistency, take a moment to taste the hummus. If desired, you can enhance the flavor by adding more salt, lemon juice, or tahini. Blend again briefly to incorporate any additional ingredients thoroughly.

          Serve: Transfer your creamy roasted garlic hummus to a serving bowl. For an eye-catching finish, drizzle a little extra olive oil on top, then garnish with freshly chopped herbs and a sprinkle of paprika to bring out vibrant color.

            Chill (Optional): For the best flavor experience, let the hummus chill in the refrigerator for at least 30 minutes before serving. This allows the flavors to meld beautifully.

              Prep Time: 10 minutes | Total Time: 40 minutes | Servings: 4-6

                - Presentation Tips: Serve the hummus with warm pita bread or fresh vegetable sticks for dipping. You could also arrange a colorful platter with your favorite dippers alongside the hummus for an inviting spread!