Go Back
In today's fast-paced world, the allure of homemade snacks has become more appealing than ever. With growing awareness of health and nutrition, families are increasingly turning to homemade options that not only satisfy cravings but also provide nourishment. One delightful recipe that stands out in this realm is the Rainbow Crunch Snack Bars. These vibrant, no-bake treats offer a balance of taste, nutrition, and visual appeal, making them a perfect choice for families, health-conscious individuals, and children alike.

Colorful Back To School Treats

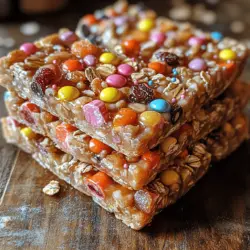
Discover the vibrant and nutritious Rainbow Crunch Snack Bars, a perfect homemade treat for health-conscious families. These no-bake bars combine rolled oats, nut butter, and colorful mix-ins, offering a satisfying blend of flavors and textures. Ideal for post-school snacks or outdoor energy boosts, they can be customized with your favorite fruits, nuts, and chocolates. Follow our easy step-by-step guide to create delicious bars that everyone will love, making healthy snacking fun and engaging for the whole family. Enjoy the process and the delightful results!

Ingredients
  

1 cup rolled oats

½ cup almond butter (or substitute with peanut butter for a different flavor)

¼ cup honey or maple syrup

1 cup colorful mini chocolate candies (such as M&M's for a fun twist)

½ cup dried fruit (options include raisins, cranberries, or chopped apricots)

½ cup chopped nuts (choose from almonds, walnuts, or your favorite kind)

¼ tsp sea salt

1 tsp vanilla extract

Optional: sprinkles for an extra touch of whimsy

Instructions
 

Prepare the Pan: Start by lining an 8x8 inch baking dish with parchment paper. Make sure to leave some overhang on the sides; this will help you remove the bars easily once they're set.

    Mix Ingredients: In a large mixing bowl, combine the rolled oats, almond butter, and honey (or maple syrup). Use a spoon or spatula to mix these ingredients thoroughly until the mixture is uniform and creamy.

      Add Color: Gently fold in the colorful mini chocolate candies, dried fruit, chopped nuts, sea salt, and vanilla extract. Take care to mix everything evenly, ensuring that the candies and nuts are well-distributed throughout the mixture.

        Transfer to Pan: Pour the mixture into the prepared baking dish. Using a spatula or your hands, press the mixture down firmly to compact it evenly across the bottom of the pan. This will help the bars hold together once they’re cut.

          Chill: Place the baking dish in the refrigerator and let it chill for at least 1-2 hours. This will allow the bars to firm up properly.

            Cut & Serve: Once the mixture is set, carefully lift it out of the pan using the parchment paper overhang. Place it on a cutting board and cut it into squares or bars. If you’d like an extra touch of fun, feel free to sprinkle some colorful sprinkles on top before serving.

              Storage: Store any leftover bars in an airtight container at room temperature for up to a week, or refrigerate them for extended freshness.

                Prep Time, Total Time, Servings: 15 mins | 2 hrs | 12 bars