
Toasty Garlic Knotted Rolls Recipe
There’s something undeniably enchanting about the aroma of freshly baked bread wafting through your kitchen. The very act of baking bread has a special way of transforming a house into a home, filling it with warmth and comfort. Among the myriad of bread recipes that exist, few can match the delightful combination of flavors and textures found in Toasty Garlic Knotted Rolls. These rolls are not just a side dish; they are an experience—soft, fluffy, and infused with the irresistible essence of garlic and aromatic herbs.
Garlic knotted rolls are a versatile addition to any meal, making them perfect for family dinners, festive gatherings, or even a cozy night in. The rich flavors of garlic and butter meld beautifully into the dough, creating a delectable roll that pairs well with pasta dishes, soups, and salads alike. Whether you’re serving them alongside a hearty lasagna or enjoying them on their own with a drizzle of olive oil, these rolls are sure to impress.
Understanding the Ingredients
To create the perfect batch of Toasty Garlic Knotted Rolls, it’s essential to understand the key ingredients that contribute to their mouthwatering flavor and texture. Each component plays a critical role in the development of the dough and the final product.
1. All-Purpose Flour: The backbone of any bread recipe, all-purpose flour provides the necessary structure for the rolls. Its moderate protein content allows for a light yet sturdy texture, making it ideal for these knotted rolls.
2. Active Dry Yeast: Yeast is the magical ingredient that brings bread to life. It ferments the sugars in the dough, producing carbon dioxide, which causes the dough to rise. Active dry yeast must be properly activated to ensure your rolls have the perfect rise and texture.
3. Warm Milk: The warmth of the milk is crucial in activating the yeast. It creates an optimal environment for the yeast to thrive, ensuring that your rolls will be light and fluffy.
4. Granulated Sugar: A touch of sweetness from granulated sugar not only enhances the flavor but also serves as food for the yeast, aiding in its activation and helping the dough rise.
5. Unsalted Butter: Butter adds richness and flavor to the rolls while also contributing to their tender texture. Using unsalted butter allows you to control the salt levels in the recipe.
6. Egg: The inclusion of an egg acts as a binding agent, enriching the dough and helping to create a soft, cohesive texture.
7. Garlic and Parsley: These ingredients are the stars of the show, infusing the rolls with their distinct flavors. Fresh garlic lends a pungent, aromatic quality, while parsley adds a fresh, herbal note.
8. Parmesan Cheese: This ingredient elevates the rolls by adding depth and a savory richness that complements the garlic beautifully.
9. Sea Salt: A crucial element in baking, salt balances the flavors and enhances the overall taste of the rolls.
Step-by-Step Guide to Making Toasty Garlic Knotted Rolls
Activating the Yeast
The first step in creating your Toasty Garlic Knotted Rolls is to activate the yeast. This step is vital for achieving the perfect rise in your dough. To activate active dry yeast, begin by measuring out the required amount and placing it in a bowl. Add a small amount of warm milk (ideally between 100°F and 110°F) along with a teaspoon of granulated sugar. The sugar serves as food for the yeast, prompting it to start working. Allow the mixture to sit for about 5 to 10 minutes. During this time, you should see the yeast begin to bubble and foam. This indicates that the yeast is alive and ready to be incorporated into your dough. If you don’t see any bubbling, it’s best to start over with fresh yeast, as this is a crucial step for ensuring a successful rise.
Making the Dough
Once your yeast is activated, it’s time to make the dough. In a large mixing bowl, combine your all-purpose flour and sea salt. Make a well in the center and pour in the activated yeast mixture, followed by the remaining warm milk, the melted unsalted butter, and the egg. Using a wooden spoon or a spatula, gently mix the ingredients together until a shaggy dough begins to form. The well technique is essential here, as it allows the wet ingredients to gradually incorporate into the dry ingredients, ensuring an even distribution throughout the dough.
As the dough starts to come together, you may find it easier to switch from a spoon to your hands. Knead the dough in the bowl until it is well combined, making sure to scrape down the sides to incorporate all the flour. The dough should be slightly tacky but not overly sticky; if it’s too sticky, you can add a little more flour, a tablespoon at a time, until the desired consistency is achieved.
Kneading the Dough
Kneading is a critical step in bread-making, as it develops the gluten structure that gives the rolls their characteristic chewiness and texture. You can knead the dough by hand or use a stand mixer fitted with a dough hook. If kneading by hand, turn the dough out onto a lightly floured surface and knead for about 8 to 10 minutes. Push the dough away from you with the heels of your hands, fold it back over, and repeat this motion, turning the dough a quarter turn every few kneads for even development.
If you choose to use a stand mixer, mix the dough on low speed until it begins to come together, then increase to medium speed and knead for about 5 to 7 minutes. The dough should be smooth and elastic when finished; if it’s too sticky, continue kneading for a few more minutes. In either case, the goal is to create a dough that is soft and pliable, yet holds its shape when formed into rolls.
As you embark on this culinary journey of creating Toasty Garlic Knotted Rolls, each of these initial steps sets the stage for a delicious outcome. The combination of activating the yeast, making the dough, and kneading it properly is essential for achieving the perfect rolls that will elevate any meal. Stay tuned for the next part of this recipe, where we’ll explore the process of shaping the rolls, preparing the garlic topping, and baking them to golden perfection.
{{image_2}}
First Rise
The first rise is a crucial step in the bread-making process, allowing the yeast to ferment and produce carbon dioxide, which gives the dough its volume and airy texture. This initial fermentation also contributes to the development of flavor, as the yeast breaks down sugars in the flour.
Creating an Ideal Environment for Rising
To ensure your dough rises properly, it’s essential to create an optimal environment. Here are some tips to achieve the best results:
1. Warmth: Yeast thrives in a warm environment. Aim for a temperature between 75°F and 85°F (24°C to 29°C). If your kitchen is cool, you can place the dough in an oven that has been preheated for a few minutes and then turned off. Alternatively, placing the bowl of dough near a sunny window can also help.
2. Humidity: A slightly humid environment prevents the dough from drying out. You can cover the bowl with a damp kitchen towel or plastic wrap to retain moisture and warmth during the rising process.
3. Time: Allow the dough to rise for about 1 to 2 hours, or until it has doubled in size. Be patient; the longer fermentation period can enhance the flavor and texture of your rolls.
Preparing Garlic Butter
Now that your dough is rising, it’s time to prepare the luxurious garlic butter that will take these rolls to the next level. This flavorful addition will coat the rolls just before baking, infusing them with a rich, aromatic taste.
Recipe for Garlic Butter
Ingredients:
– ½ cup (1 stick) unsalted butter, softened
– 4 cloves of garlic, minced
– 2 tablespoons fresh parsley, finely chopped
– ½ teaspoon salt
– ¼ teaspoon black pepper
Method:
1. Sauté the Garlic: Start by melting the butter in a small saucepan over medium heat. Add the minced garlic and sauté for about 1-2 minutes, until fragrant and lightly golden. Be cautious; burnt garlic can taste bitter.
2. Combine: Remove from heat and stir in the chopped parsley, salt, and pepper. This step not only enhances the flavor profile but also adds a beautiful color to the garlic butter.
3. Set Aside: Allow the garlic butter to cool slightly while your dough continues to rise. This will make it easier to brush onto the rolls later.
Shaping the Rolls
Once your dough has doubled in size, it’s time to shape it into delightful knots. Shaping is an important step as it influences the final appearance and texture of the rolls.
Detailed Instructions:
1. Divide the Dough: Gently punch down the risen dough to release any air bubbles. Transfer it onto a lightly floured surface. Divide the dough into 12 equal pieces, each weighing about 2 ounces.
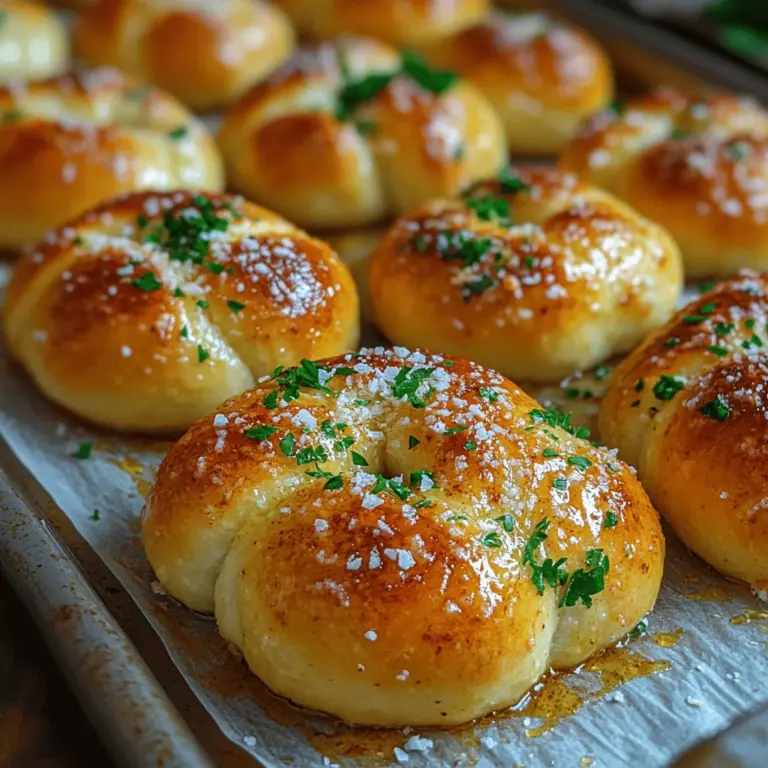
2. Shape the Knots: Roll each piece into a long rope, about 10-12 inches in length. To shape the knot, create a loop with the rope, then take the end and wrap it around the loop once before tucking the end underneath. Place the shaped roll on a parchment-lined baking sheet.
3. Visual Cues: Aim for a smooth, tight knot. If the dough is too sticky, dust your hands with a little flour. The rolls should be uniform in size for even baking.
Second Rise
The second rise is equally important as the first. It allows the dough to relax and rise further, leading to light and fluffy rolls.
Importance of the Second Rise
During this phase, the gluten structure strengthens, and the yeast continues to ferment, giving the rolls their characteristic airy texture. Without this step, the rolls may turn out dense and tough.
Tips for Covering and Maintaining Warmth
1. Cover: Loosely cover the shaped rolls with a clean kitchen towel or plastic wrap to prevent them from drying out.
2. Warm Location: Similar to the first rise, place the rolls in a warm place to encourage rising. This will typically take about 30-45 minutes, or until they have puffed up nicely.
Baking the Rolls
Now that your rolls have completed their second rise, it’s time to bake them to perfection.
Preheating the Oven: Why It Matters
Preheating the oven to 375°F (190°C) is essential for achieving the perfect bake. An adequately heated oven ensures that the rolls begin to rise immediately when placed inside, resulting in a soft and fluffy texture.
Techniques for Brushing and Garnishing
1. Brush with Garlic Butter: Once the oven is ready, take your garlic butter and brush a generous amount over each roll. This adds flavor and helps achieve a beautifully golden color.
2. Optional Garnish: For an extra touch, sprinkle the tops with a pinch of sea salt and additional chopped parsley for a pop of color. This not only enhances the visual appeal but also adds a burst of flavor with each bite.
3. Bake: Place the baking sheet in the oven and bake for 15-20 minutes, or until the rolls are golden brown. The aroma of baking garlic knots will fill your kitchen, making it hard to resist!
Serving Suggestions
These toasty garlic knotted rolls make an excellent addition to any meal or occasion. Here are a few serving suggestions to elevate your dining experience:
1. Pair with Soups and Salads: Serve the rolls alongside a hearty soup or a fresh salad. The warm, buttery rolls are perfect for soaking up flavors and adding a comforting element to your meal.
2. Accompany with Dips: Consider pairing them with a warm marinara sauce, creamy ranch dressing, or a zesty garlic aioli for dipping. This can enhance the flavor profile and provide an interactive dining experience.
3. Presentation: For an appealing presentation, arrange the rolls on a serving platter and garnish with fresh herbs. The warmth and enticing aroma of freshly baked rolls will surely impress your guests.
Nutritional Benefits of Garlic Knotted Rolls
While these rolls are delightfully indulgent, they also provide several health benefits, especially from the key ingredients.
Health Benefits of Garlic
Garlic is not only a flavorful addition but also offers numerous health benefits. It contains compounds such as allicin, which have been shown to boost the immune system, reduce blood pressure, and improve cholesterol levels. Additionally, garlic is rich in antioxidants, which help combat oxidative stress in the body.
Role of Whole Grains in All-Purpose Flour
Using all-purpose flour provides the necessary structure for the rolls, while incorporating whole grains can enhance their nutritional profile. Whole grains are a good source of fiber, which aids digestion and promotes a feeling of fullness. Opting for whole grain flour can also add a nutty flavor and improve the overall nutrient content of your rolls.
Conclusion
Baking these toasty garlic knotted rolls is not just about creating a delicious accompaniment for your meals; it’s about the joy of the entire process—from kneading the dough to the delightful aroma wafting through your kitchen as they bake. These rolls are rich in flavor, warm in texture, and sure to elevate any meal or occasion.
Whether you’re serving them at a family dinner, holiday gathering, or simply enjoying them with a cozy bowl of soup, these rolls will surely impress. So, embrace the baking process, savor the results, and share these delightful garlic knotted rolls with your loved ones. Happy baking!
