
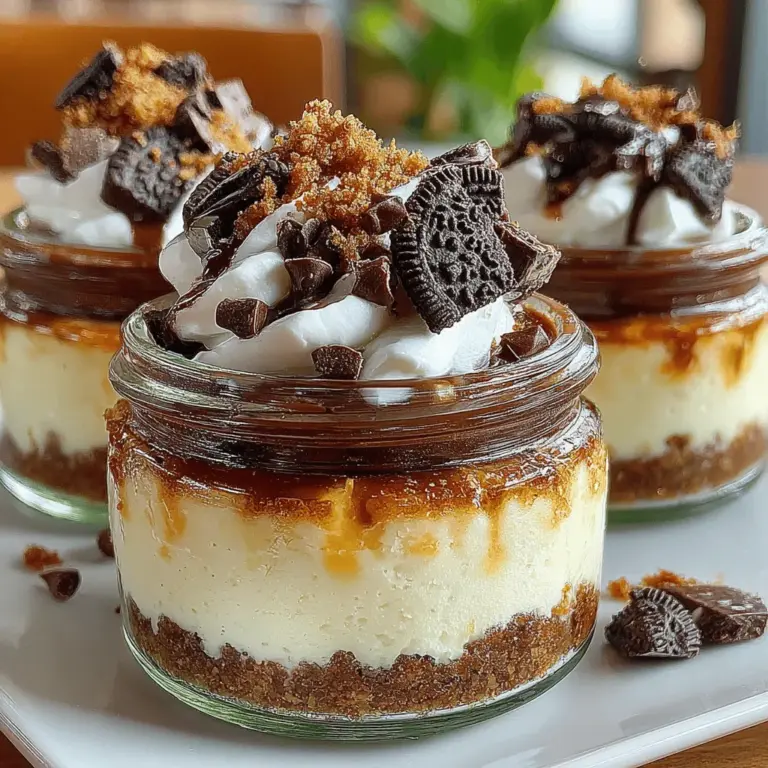
Delightful No-Bake Oreo Cheesecake Cups
In the world of desserts, no-bake recipes have carved out a special niche for themselves, celebrated for their simplicity and ease of preparation. These delightful treats have gained immense popularity among home bakers and dessert enthusiasts alike, offering a quick and hassle-free way to indulge in something sweet without the need for an oven. Among the myriad of no-bake options, the Delightful No-Bake Oreo Cheesecake Cups stand out as a perfect choice for any occasion. Whether you’re hosting a casual gathering, celebrating a birthday, or simply craving a decadent dessert, these individual cheesecake cups are sure to impress.
The appeal of no-bake desserts, particularly in the form of cheesecake, lies not only in their delicious flavor but also in their straightforward preparation. With minimal ingredients and quick assembly, you can whip up a batch of these delightful Oreo cheesecake cups in no time. Plus, the individual servings make them a charming addition to any dessert table, allowing guests to enjoy their own personalized treat without the need for slicing and serving.
Understanding No-Bake Desserts
No-bake desserts are defined by their lack of cooking or baking, relying instead on refrigeration to set and achieve the desired consistency. This characteristic makes them particularly appealing for those who may be intimidated by traditional baking methods or for anyone looking to save time in the kitchen. No-bake recipes often require simple ingredients and straightforward techniques, making them accessible to bakers of all skill levels.
One of the key benefits of no-bake recipes is their convenience. With no need for an oven, you can prepare these desserts in warm weather without heating up your kitchen. They also offer a greater degree of flexibility, as many recipes can be customized to accommodate different flavors and dietary preferences. This flexibility, combined with the simplicity of preparation, has contributed to the rising popularity of no-bake desserts in recent years.
Among the many variations of no-bake sweets, cheesecake remains a perennial favorite. Its rich, creamy texture and versatile flavor profile make it a beloved choice for dessert lovers. From classic New York-style cheesecake to innovative flavor combinations, cheesecake lends itself beautifully to no-bake preparations. The Delightful No-Bake Oreo Cheesecake Cups take this beloved dessert to new heights by incorporating the iconic flavor of Oreo cookies, creating a delightful treat that is both familiar and indulgent.
Ingredients Breakdown
To create your own Delightful No-Bake Oreo Cheesecake Cups, you’ll need a few key ingredients that come together to create a harmonious blend of flavors and textures. The foundation of this recipe is built on high-quality ingredients, which are essential for achieving the best possible results.
1. Oreo Cookies: The star of the show, Oreo cookies provide the classic flavor and crunchy texture that pairs perfectly with the creamy cheesecake filling. For the crust, you’ll want to use regular Oreos, but feel free to experiment with different varieties for a unique twist.
2. Cream Cheese: This is the main component of the cheesecake filling, imparting that rich, velvety texture that makes cheesecake so irresistible. It’s crucial to use softened cream cheese for easy blending and to avoid lumps in the final mixture.
3. Heavy Whipping Cream: To achieve a light and airy cheesecake filling, heavy whipping cream is whipped to soft peaks before being folded into the cream cheese mixture. This addition provides a delightful creaminess and helps the filling maintain its shape.
4. Sugar: A touch of granulated sugar is added to balance the flavors and enhance the sweetness of the cheesecake filling.
5. Vanilla Extract: This ingredient elevates the flavor profile of the cheesecake, adding warmth and depth to the overall taste.
6. Optional Garnishes: To enhance the presentation and flavor of your Oreo cheesecake cups, consider adding optional garnishes such as whipped cream, crushed Oreos, or chocolate drizzle. These finishing touches not only make the dessert visually appealing but also add an extra layer of flavor.
Step-by-Step Preparation
Now that we’ve covered the ingredients, it’s time to dive into the preparation of the Delightful No-Bake Oreo Cheesecake Cups. The process is straightforward and can be broken down into a few simple steps, ensuring that you achieve a delicious result every time.
Preparing the Base
The first step in creating your Oreo cheesecake cups is to prepare the crust. To do this, you’ll want to start by crushing the Oreo cookies into fine crumbs. You can achieve this by placing the cookies in a resealable plastic bag and using a rolling pin to crush them, or by using a food processor for a quicker method. Aim for a consistency that resembles sand, as this will help the crust hold together once combined with melted butter.
Next, melt some butter in a microwave-safe bowl. Once melted, add the crushed Oreos to the bowl and stir until the crumbs are fully coated with the butter. This mixture should hold together when pressed; if it feels too dry, you can add a little more melted butter to achieve the right consistency.
Layering the Base
After preparing the crust mixture, it’s time to layer it into your serving cups or jars. Choose your preferred type of container; small glass jars, dessert cups, or even ramekins work beautifully for this recipe. The key is to ensure that the crust is pressed firmly into the bottom of each cup, providing a stable base for the cheesecake filling. Use the back of a spoon or your fingers to press the mixture down evenly.
Once the crust is firmly in place, set the cups aside while you prepare the cheesecake filling. This will allow the crust to set slightly, ensuring it holds its shape when you add the creamy filling on top.
Making the Cheesecake Filling
To create the luscious cheesecake filling, start by beating the softened cream cheese in a mixing bowl until it’s smooth and free of lumps. It’s important to ensure the cream cheese is at room temperature for optimal blending. Once smooth, add the granulated sugar and vanilla extract, mixing until fully incorporated.
In a separate bowl, whip the heavy cream until soft peaks form. This step is crucial, as the whipped cream will add lightness to the filling. Gently fold the whipped cream into the cream cheese mixture, being careful not to deflate the whipped cream. The goal is to maintain the airy texture while ensuring everything is well combined.
With the filling prepared, it’s time to spoon it over the crust in each cup. Use a piping bag or a spoon to carefully layer the cheesecake filling on top of the crust, smoothing the tops as you go.
Now that the initial steps are complete, you are well on your way to creating these delightful no-bake Oreo cheesecake cups. Stay tuned for the next part, where we will explore additional tips for garnishing and serving your delicious creations.
{{image_2}}
The Role of Powdered Sugar and Vanilla Extract in Enhancing Flavor
When crafting the perfect no-bake Oreo cheesecake cups, the ingredients you choose can significantly impact the final flavor profile. Powdered sugar plays a crucial role in this recipe, not just for sweetness but also for achieving a smooth texture. Unlike granulated sugar, powdered sugar dissolves more readily into the cream cheese mixture, ensuring a creamy consistency without any graininess. This results in a silky cheesecake that melts in your mouth.
Vanilla extract, on the other hand, adds depth and warmth to the overall flavor. It enhances the sweetness and complements the rich, creamy cheese. When combined with the other ingredients, these two components create a balanced and delightful taste that will keep your guests coming back for seconds.
Whipping the Cream
Explanation of the Process of Whipping Cream to Stiff Peaks
Whipping cream is a critical step in achieving the light and airy texture of your no-bake cheesecake cups. Start with cold heavy cream, as it whips up better when it’s chilled. Pour the cream into a large mixing bowl and use an electric mixer to start whipping at a medium speed. As the cream begins to thicken, gradually increase the speed to high.
Continue whipping until you reach stiff peaks, which means that the cream will hold its shape when the beaters are lifted from the bowl. Be careful not to over-whip, as this can turn the cream into butter. The perfect whipped cream should be fluffy and glossy, providing a delightful contrast to the dense cream cheese mixture you’ve prepared.
Importance of Gently Folding the Whipped Cream into the Cheese Mixture to Maintain Texture
Once your whipped cream reaches stiff peaks, it’s time to incorporate it into the cream cheese mixture. This step is crucial for maintaining the airy texture that makes the cheesecake cups so delightful. Using a spatula, gently fold the whipped cream into the cream cheese mixture. Start by adding a small amount of the whipped cream to lighten the cream cheese, then gradually add the rest.
Folding is a technique that involves carefully lifting and turning the mixture rather than stirring, which helps to retain air bubbles within the whipped cream. This process ensures that the final product is fluffy and not dense, creating a cheesecake that feels light on the palate.
Filling the Cups
Techniques for Filling the Cups for a Neat Appearance
Filling your dessert cups can be both an art and a science. To achieve a neat and professional appearance, you can use a few techniques. First, consider using a small ice cream scoop or a spoon to transfer the cheesecake mixture into each cup. This method allows for even distribution and helps to maintain the layers of cookie crumbs and cheesecake.
Option of Using a Piping Bag for a More Polished Finish
For a more polished and elegant finish, consider using a piping bag. Transfer the cheesecake mixture into the bag, and then cut a small opening at the bottom. Pipe the mixture into the cups, swirling as you go. This method not only looks beautiful but also allows you to control the amount of filling in each cup, ensuring a consistent presentation across all servings.
Chilling the Cheesecake Cups
Importance of Chilling for Texture and Flavor Development
Chilling your no-bake Oreo cheesecake cups is essential for several reasons. First, it allows the flavors to meld together, creating a more cohesive taste. Second, chilling helps the cheesecake set properly, allowing it to achieve the desired firmness. This step is crucial for ensuring that the dessert holds its shape when served.
Recommended Chilling Time for Best Results
For optimal results, it’s recommended to chill your cheesecake cups in the refrigerator for at least 4 hours, although overnight is ideal. This longer chilling time allows the layers to firm up and prevents any unwanted runniness when the cups are served. If you’re short on time, aim for a minimum of 2 hours, but be prepared for a softer texture.
Garnishing Your Cheesecake Cups
Creative Ideas for Garnishes to Elevate the Dessert
Garnishing your no-bake Oreo cheesecake cups can elevate the presentation and enhance the flavor. Here are some creative ideas for garnishes that will impress your guests:
– Crushed Oreos: Sprinkling crushed Oreos on top not only adds texture but also reinforces the Oreo flavor of the dessert. It’s a simple yet effective way to enhance the visual appeal of your cups.
– Cocoa Powder and Chocolate Shavings: For a more sophisticated look, consider dusting the tops with cocoa powder or adding chocolate shavings. This will introduce a rich chocolate flavor that complements the creaminess of the cheesecake.
– Mini Chocolate Chips: For an extra touch of sweetness, sprinkle mini chocolate chips on top. They add a fun crunch and a burst of chocolate in every bite.
Serving Suggestions
Best Occasions for Serving No-Bake Oreo Cheesecake Cups
No-bake Oreo cheesecake cups are incredibly versatile and perfect for various occasions. They are ideal for summer gatherings, birthday parties, or holiday celebrations. Their elegant appearance and delightful flavor make them a crowd-pleaser that everyone will enjoy. Additionally, they can be made ahead of time, allowing you to spend more time with your guests and less time in the kitchen.
Pairing Ideas: Beverages or Additional Desserts that Complement the Cheesecake
When serving these cheesecake cups, consider pairing them with beverages such as coffee, tea, or a glass of dessert wine. A rich espresso can enhance the chocolate flavors, while a sweet dessert wine adds a delightful contrast. If you want to serve additional desserts, consider light options such as fruit tarts or sorbets to balance the richness of the cheesecake.
Recommendations for Storing Leftovers (if any)
If you happen to have any leftover cheesecake cups, store them in an airtight container in the refrigerator. They can typically be kept for up to 3-4 days. However, for the best taste and texture, it’s recommended to enjoy them within the first couple of days after making them.
Nutritional Information
Overview of Caloric Content and Nutritional Aspects of the Recipe
Each no-bake Oreo cheesecake cup is a delicious indulgence. A single serving typically contains around 200-250 calories, depending on portion size and specific ingredients used. While these cups are a sweet treat, they also offer a nice balance of flavors that can be enjoyed in moderation.
Discussion on Portion Sizes and Indulgence
When indulging in desserts, portion control is key. These cheesecake cups are rich and satisfying, making them perfect for small servings. Consider serving them in smaller cups or jars to help control portions while still allowing everyone to enjoy a delightful dessert experience.
Conclusion
In summary, making Delightful No-Bake Oreo Cheesecake Cups is a straightforward and enjoyable process. With just a few simple steps, you can create an elegant dessert that is sure to impress. The combination of creamy cheesecake, crunchy Oreos, and delightful garnishes makes this treat a favorite among dessert lovers.
We encourage you to give this recipe a try and experience the joy of creating something special in your kitchen. Whether you’re serving them for a special occasion or enjoying them as an everyday treat, these cheesecake cups are sure to bring delight to your taste buds and those of your friends and family. Embrace the joy of sharing homemade treats, and watch as these no-bake cheesecake cups become a beloved staple in your dessert repertoire.
