When it comes to the realm of baked goods, few treats hold the same nostalgic allure as the classic chocolate chip cookie. With their warm, gooey centers and crisp edges, chocolate chip cookies have been a beloved staple in kitchens across the globe for generations. However, in the pursuit of convenience and shareability, a delightful evolution has taken place: the chocolate chip cookie bar. These chewy cookie bars encapsulate the essence of traditional cookies but bring a new level of ease and enjoyment to the table.
Imagine all the flavors and textures you love in a cookie, but in a form that is perfect for gatherings, snacks, or even a simple dessert at home. Chewy chocolate chip cookie bars are ideal for cutting into squares and sharing with friends and family, making them a fantastic addition to any occasion. The simplicity of the recipe means you can whip them up with minimal hassle, allowing you to indulge in their deliciousness without spending hours in the kitchen.
The Magic of Chewy Chocolate Chip Cookie Bars
Cookie bars have surged in popularity, and it’s not hard to see why. One of the main advantages of cookie bars over traditional cookies is the texture. While cookies may vary from crisp to chewy depending on the recipe, cookie bars consistently deliver a chewy, gooey experience throughout. This uniform texture is not only satisfying but also makes each bite just as enjoyable as the last.
Moreover, the preparation of cookie bars is significantly easier than that of their round counterparts. Instead of rolling individual dough balls, you simply spread the dough into a baking dish and let the oven do the work. This streamlined process is perfect for those who want to bake without the fuss. The shareability factor also cannot be overlooked; with cookie bars, you can easily cut them into squares, making them perfect for parties, potlucks, or simply as an after-school treat.
Families and friends have quickly embraced the cookie bar phenomenon, finding joy in both the baking and the sharing experiences. The ability to customize these bars with different mix-ins, toppings, or flavor variations only adds to their charm. Whether enjoyed warm with a scoop of ice cream or packed into lunchboxes, chewy chocolate chip cookie bars have become a favorite for all ages.
Essential Ingredients for Chewy Chocolate Chip Cookie Bars
Creating the perfect chewy chocolate chip cookie bars begins with understanding the role of each ingredient. Here’s a closer look at the essential components that make these bars irresistible:
– Unsalted Butter: The foundation of any great cookie bar recipe, softened unsalted butter adds creaminess and richness to the dough. Using unsalted butter allows you to control the salt content in your recipe, ensuring the perfect balance of flavors. For optimal results, let the butter come to room temperature before mixing, which helps achieve a smooth and creamy consistency.
– Sugars: This recipe calls for both brown and granulated sugar, each contributing unique qualities to the final product. Brown sugar adds moisture and a hint of caramel flavor, enhancing the chewiness of the bars. Granulated sugar, on the other hand, helps create a slight crispness on the edges while contributing to the overall sweetness of the cookie bars.
– Eggs: Eggs are crucial for providing structure and moisture to the cookie bars. They help bind the ingredients together and contribute to the chewy texture. Using large eggs is standard, and be sure to incorporate them thoroughly for even distribution throughout the dough.
– Vanilla Extract: A key flavor enhancer, vanilla extract elevates the overall taste of the cookie bars. Opt for pure vanilla extract for the best flavor, as artificial vanilla can lack the depth and richness that pure extract provides.
– Flour, Baking Soda, and Salt: All-purpose flour serves as the main structure for the cookie bars, while baking soda acts as a leavening agent, helping the bars rise slightly during baking. The addition of salt is essential to balance the sweetness and enhance the flavors, allowing each ingredient to shine.
– Chocolate Chips: The star of the show, chocolate chips are what make these bars truly irresistible. Whether you prefer semi-sweet, dark, or even milk chocolate chips, the choice is yours. They melt beautifully during baking, creating pockets of gooey chocolate goodness in every bite.
– Optional Nuts: For those who enjoy a little crunch, adding chopped walnuts or pecans can elevate the flavor and texture of the cookie bars. Nuts provide a delightful contrast to the softness of the bars, adding both taste and nutritional value.
Step-by-Step Instructions for Perfect Cookie Bars
Now that you have all the essential ingredients, let’s dive into the detailed walkthrough of making chewy chocolate chip cookie bars. Following these steps will help ensure that your cookie bars turn out perfectly every time.
Preheating the Oven
The first step in baking any cookie bar is preheating your oven. Set your oven to 350°F (175°C). Preheating is crucial, as it ensures that your cookie bars bake evenly and achieve the right texture. While the oven is heating, you can start preparing your dough.
Mixing Wet Ingredients
In a large mixing bowl, begin by creaming together the softened unsalted butter, brown sugar, and granulated sugar. Use an electric mixer on medium speed to combine these ingredients until the mixture is smooth and creamy. This process is vital, as it incorporates air into the butter, helping to create a light and fluffy texture in your cookie bars.
Once the butter and sugars are well combined, add in the eggs, one at a time, mixing thoroughly after each addition. After the eggs are incorporated, stir in the vanilla extract, ensuring it is evenly distributed throughout the mixture. This step is important for achieving a consistent flavor in every bite.
Incorporating Eggs and Vanilla
With your wet ingredients ready, it’s time to incorporate the dry ingredients. In a separate bowl, whisk together the all-purpose flour, baking soda, and salt. Gradually add the dry mixture to the wet ingredients, mixing on low speed until just combined. Be careful not to overmix; you want to maintain the tenderness of the dough. As you fold in the flour, you may notice the dough becoming thicker and more cohesive.
After the dry ingredients are combined, gently fold in the chocolate chips (and nuts, if using) with a spatula. This ensures that the chocolate chips are evenly distributed throughout the dough, providing a delicious burst of flavor in every square.
By following these initial steps carefully, you’re well on your way to creating a batch of chewy chocolate chip cookie bars that will delight everyone who tries them. In the next part of this article, we will continue with further baking instructions and tips for achieving the best results with your cookie bars. Stay tuned for more!
{{image_2}}
Combining Dry Ingredients
The foundation of any great cookie bar lies in the careful combination of dry ingredients. For our chewy chocolate chip cookie bars, this means mixing flour, baking soda, and salt in a separate bowl before merging them with the wet ingredients. This step is crucial for ensuring an even distribution of the leavening agent and flavor enhancers throughout the dough.
When combining your dry ingredients, it’s essential to whisk them together gently until they are fully integrated. Over-mixing can lead to a denser texture rather than the chewy, soft bars we desire. Aim for a light, airy mixture that is just combined, which will help maintain the integrity of the cookie bar’s structure.
Merging Mixtures
Once your dry ingredients are ready, it’s time to merge them with the wet mixture, which typically includes butter, sugars, and eggs. Begin by adding the dry ingredients to the wet mixture gradually. This technique allows for better control over the consistency of the dough. Use a spatula or wooden spoon to combine the mixtures gently.
The goal here is to achieve a thick, cohesive dough without overworking it. As you combine the ingredients, you should be able to see the flour gradually disappearing into the mixture, forming a sticky and slightly glossy dough. If you notice your dough is too crumbly, a splash of milk can help bring it together, ensuring that the cookie bars remain chewy and moist.
Folding in Add-ins
Incorporating chocolate chips and nuts is what elevates your cookie bars from good to great. Once your dough is well mixed, it’s time to fold in the add-ins. Use a spatula to gently lift and turn the dough, allowing the chocolate chips and nuts to distribute evenly without breaking them apart or crushing the dough.
For a balanced flavor, consider using a mix of semi-sweet and dark chocolate chips, or even white chocolate for a different twist. If you choose to include nuts, such as walnuts or pecans, chop them coarsely to ensure they blend well without overpowering the dough. The folding technique is vital here, as it maintains the airiness of the dough while ensuring the add-ins are well distributed.
Baking
The baking process is where your cookie bars begin to transform from raw dough into a delightful treat. Preheat your oven to 350°F (175°C) before you start baking—this ensures even cooking throughout. Once your dough is spread evenly in a greased baking dish, place it in the oven and keep a close eye on the baking time.
Typically, your chewy chocolate chip cookie bars will take about 25-30 minutes to bake. The perfect indicators of doneness are slightly golden edges and a center that looks set but remains slightly soft. As the bars cool, they will continue to firm up to achieve that ideal chewy texture. Avoid overbaking, as this will lead to a dry product.
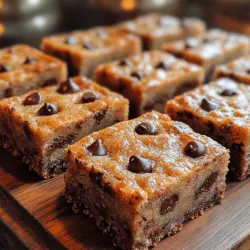
Cooling and Cutting
After baking, allow the cookie bars to cool in the pan for about 10-15 minutes. This rest time is essential, as it allows the bars to firm up slightly, making them easier to cut. For clean cuts, use a sharp knife and cut the bars into squares or rectangles while they are still warm. A gentle sawing motion rather than pressing down too hard will ensure that the edges remain intact.
If you want to serve them later, let the bars cool completely on a wire rack. This not only prevents them from becoming soggy but also helps maintain their chewy texture. Once cooled, you can store them in an airtight container or wrap them in plastic wrap to maintain freshness.
Baking Time and Temperature: Key Factors for Success
Baking time and temperature are critical factors in achieving the ideal chewy texture of your cookie bars. Every oven is different; variations in temperature can affect baking times significantly. It’s wise to check your cookie bars a few minutes before the suggested time, especially if you’re using a convection oven, which generally cooks faster.
If you find that your bars are browning too quickly on the edges but still appear undercooked in the center, consider rotating the pan halfway through baking. Additionally, using an oven thermometer can help ensure your oven is calibrated correctly, leading to perfectly baked cookie bars every time.
Presentation Ideas for Cookie Bars
Once your chewy chocolate chip cookie bars are baked and cooled, the next step is presentation. The way you present your treats can elevate their appeal, especially when entertaining guests or enjoying them at a gathering.
– Dusting with Powdered Sugar: A light dusting of powdered sugar can add a touch of elegance and a hint of sweetness to your cookie bars. Use a fine sieve to sprinkle a light coating for a beautiful finish.
– Serving with Ice Cream: Pairing these cookie bars with a scoop of vanilla ice cream creates a delightful contrast in temperature and texture. The warm bars against the cold ice cream is a classic combination that never fails to impress.
– Plating Suggestions: Arrange the cookie bars on a decorative platter, perhaps placing them on parchment paper for a rustic touch. You can garnish the plate with fresh berries or a drizzle of chocolate sauce to create an inviting presentation that encourages indulgence.
Storage Tips for Cookie Bars
To maintain the freshness of your chewy chocolate chip cookie bars, proper storage is key. Place the leftover bars in an airtight container at room temperature, where they can stay fresh for up to a week. If you want to extend their shelf life, consider freezing them.
To freeze, wrap individual bars in plastic wrap and then place them in a freezer-safe bag or container. This method allows you to enjoy a delicious treat later without compromising the flavor or texture. When you’re ready to enjoy a frozen bar, simply let it thaw at room temperature or warm it in the microwave for a few seconds for that fresh-out-of-the-oven taste.
Nutritional Information and Serving Suggestions
While chewy chocolate chip cookie bars are a delightful indulgence, it’s important to enjoy them in moderation. Each serving, typically around one bar, provides a satisfying treat that balances sweetness and texture. The nutritional content can vary based on your specific ingredients, but on average, each bar contains approximately 200 calories, 10g of fat, 30g of carbohydrates, and 2g of protein.
To enhance your dessert experience, consider pairing your cookie bars with beverages like cold milk, hot coffee, or a glass of dessert wine. The combination of flavors will elevate your enjoyment and create a memorable experience.
Conclusion: The Timeless Appeal of Chewy Chocolate Chip Cookie Bars
Chewy chocolate chip cookie bars are a timeless treat that brings joy to any occasion. Whether you’re celebrating a birthday, hosting a movie night, or simply craving something sweet, these cookie bars are a perfect choice. Their ease of preparation and universal appeal make them a favorite among bakers and dessert lovers alike.
Baking these cookie bars not only fills your home with delightful aromas but also creates cherished moments with family and friends. As you embark on your baking journey, remember to savor each step—from mixing the ingredients to enjoying the first warm bite. We encourage you to create your own memorable moments with this recipe, embracing the simple pleasure of baking and indulging in these delicious chewy chocolate chip cookie bars.