
Creating Delicious Back To School Quesadillas: A Healthy and Fun Recipe for the Family
Introduction
As the school year kicks off, busy parents are often on the lookout for quick, nutritious meals that can cater to their children’s tastes. The Back To School Quesadillas are the perfect solution, offering a delightful dish that seamlessly combines convenience with essential nutrition. These quesadillas are not only easy to prepare but also incredibly versatile, making them ideal for both lunchboxes and after-school snacks. With a mix of whole wheat tortillas, wholesome fillings, and gooey cheeses, this recipe is poised to become a family favorite.
Quesadillas have long been a beloved staple in many households, providing a simple yet satisfying meal option. Their origins can be traced back to Mexico, where they were traditionally made with corn tortillas and filled with cheese and various other ingredients. Over the years, quesadillas have evolved, with families around the globe putting their own spin on this classic dish. The Back To School Quesadillas take this culinary tradition and adapt it to meet the needs of modern parents and picky eaters alike.
What sets this recipe apart is its emphasis on health without sacrificing flavor. The ingredients are chosen not only for their taste but also for their nutritional benefits, ensuring that every bite supports your child’s growth and development. Let’s dive deeper into the ingredients that make these quesadillas a wholesome choice.
Understanding the Ingredients
Exploring the Nutritional Benefits of Each Component
1. Whole Wheat Tortillas: A healthier alternative to traditional tortillas, whole wheat varieties are packed with more fiber and nutrients. They provide essential carbohydrates for energy while aiding digestion, making them a smart choice for active kids. Whole wheat tortillas also offer a nuttier flavor that enhances the overall taste of the quesadilla.
2. Cheddar and Mozzarella Cheese: The combination of cheddar and mozzarella cheese not only creates a delicious duo of flavors but also provides a significant source of protein and calcium—two critical nutrients for growing children. Protein is essential for muscle development, while calcium supports strong bones and teeth. The gooey texture of melted cheese adds satisfaction to each bite, making it a hit with kids.
3. Chicken vs. Black Beans: When it comes to protein options, both cooked chicken and black beans are excellent choices. For meat-eaters, chicken provides lean protein that helps sustain energy levels throughout the day. Alternatively, black beans offer a plant-based protein source that is rich in fiber and essential nutrients. They are an ideal option for vegetarians and can easily be seasoned to complement the other flavors in the quesadilla.
4. Vegetables: The addition of vegetables like bell peppers, corn, and onions brings a burst of color, flavor, and nutrition to the quesadillas. These veggies are rich in vitamins and minerals, supporting overall health and immune function. Bell peppers, for instance, are high in vitamin C, while corn offers antioxidants that contribute to a well-rounded diet. Including vegetables not only enhances the taste but also helps parents sneak in those important servings of produce.
Preparing the Filling
Creating a Flavorful Mixture
The filling is the heart of the Back To School Quesadillas, and creating a flavorful mixture is key to making them a hit with the whole family. Here’s how to prepare the filling step-by-step:
1. Start with the Protein: If you’re using chicken, begin by cooking it thoroughly. Grilled or sautéed chicken breast works well and can be shredded or diced into bite-sized pieces. For a vegetarian option, rinse and drain canned black beans. These can be mashed slightly to help them meld with the other ingredients.
2. Incorporate the Veggies: Dice bell peppers and onions into small pieces. If you’re using corn, you can either use fresh corn off the cob or canned corn (rinsed and drained). Sauté the vegetables in a little olive oil until they are tender but still retain some crunch—a method that enhances their flavor and texture.
3. Seasoning the Mixture: To elevate the taste of your filling, season it with taco seasoning, garlic powder, and a touch of cumin. Taco seasoning adds a wonderful blend of spices, while garlic powder and cumin introduce depth and warmth to the mix. Adjust the seasoning according to your family’s palate, and don’t shy away from experimenting with other spices that might enhance the flavor profile.
4. Combine the Ingredients: In a large bowl, mix the cooked chicken (or black beans) with the sautéed vegetables and spices. Stir everything together until well combined, ensuring that every bite is packed with flavor. For added richness, consider incorporating a sprinkle of cheese into the mixture at this stage.
Layering the Quesadilla
Tips for Perfect Assembly
Once your filling is prepared, it’s time to layer the quesadilla for cooking. Here are some tips to ensure perfect assembly:
1. Cheese First: Start by sprinkling a layer of cheese on one half of the tortilla. This acts as a glue to hold the quesadilla together, preventing the filling from spilling out during cooking. Using a combination of cheddar and mozzarella will create a deliciously gooey texture that kids love.
2. Portioning the Filling: Avoid overfilling the quesadilla to prevent it from bursting during cooking. A generous scoop of filling—typically about 1/2 to 3/4 cup—should suffice. Spread the filling evenly over the cheese, leaving a small border around the edges to allow for easy folding.
3. Top with More Cheese: For an extra cheesy experience, layer another sprinkle of cheese over the filling before folding the tortilla in half. This will ensure that both sides of the quesadilla are flavorful and appealing.
4. Cooking the Quesadilla: Heat a skillet over medium heat with a little olive oil or butter. Once hot, carefully place the quesadilla in the skillet, cooking until the bottom is golden brown and crispy, then flip to cook the other side. This method gives the quesadilla a satisfying crunch while keeping the inside warm and melty.
By following these initial steps, you’ll set yourself up for a successful and enjoyable cooking experience. The Back To School Quesadillas are not just a meal; they are a creative way to engage your children in the kitchen and encourage them to try new flavors. With a few simple ingredients and straightforward techniques, you can create a delicious, nutritious dish that the whole family will look forward to.
{{image_2}}
Cooking the Quesadilla
Achieving the Perfect Crisp
To create the perfect quesadilla, achieving a delightful crispness is key. The right temperature and oil application play crucial roles in this process.
Heat Management: Understanding the Right Temperature for Cooking Quesadillas
Start by preheating your skillet over medium heat. This temperature allows the tortillas to warm up evenly without burning, ensuring that the cheese melts beautifully while the tortilla gets that coveted golden brown color. If your skillet is too hot, the outside will brown too quickly, leaving the inside undercooked and potentially gooey. Conversely, if the heat is too low, the quesadilla will take longer to cook, resulting in a less crispy tortilla. A good test for the skillet’s readiness is to sprinkle a few drops of water onto the surface; if they sizzle and evaporate immediately, you’re ready to start cooking.
Oil Application: The Significance of Using Olive Oil to Achieve That Golden Brown Crust
Using olive oil is essential for achieving that perfect, crispy crust. Not only does it enhance the flavor of the quesadilla, but it also helps to prevent the tortillas from sticking to the pan. To apply the oil, pour a tablespoon into your skillet, then use a paper towel or brush to spread it evenly across the surface. This thin layer is enough to create a barrier that helps achieve a beautiful, crispy exterior without making the quesadilla greasy. If you prefer a lighter option, you can also use cooking spray, but olive oil brings a richer flavor that complements the fillings.
Flipping and Finishing Touches
Ensuring Even Cooking
Flipping a quesadilla can be tricky, but with the right technique, you can safely turn it without spilling the delicious fillings.
Techniques for Flipping: How to Safely Turn the Quesadilla Without Spilling the Filling
To flip your quesadilla, use a large spatula to gently lift one side. Carefully slide the spatula under the quesadilla, ensuring you have a good grip on it. With one swift motion, flip it over onto the other side. If you’re worried about losing any filling, you can also use a second spatula to support the quesadilla as you flip it, ensuring it remains intact. Allow it to cook for an additional 2-3 minutes on this side, until it becomes crispy and golden brown.
Checking for Doneness: Visual Cues to Know When Your Quesadilla is Perfectly Cooked
The visual cues for doneness are simple yet effective. Look for a golden brown color on both sides of the quesadilla and ensure that the cheese has melted fully. You can gently press down on the quesadilla with the spatula to help release steam, which will also help the cheese melt more evenly. If you see any cheese oozing out the sides, that’s a good sign it’s well-cooked. Once ready, remove it from the skillet and let it rest for a minute before slicing.
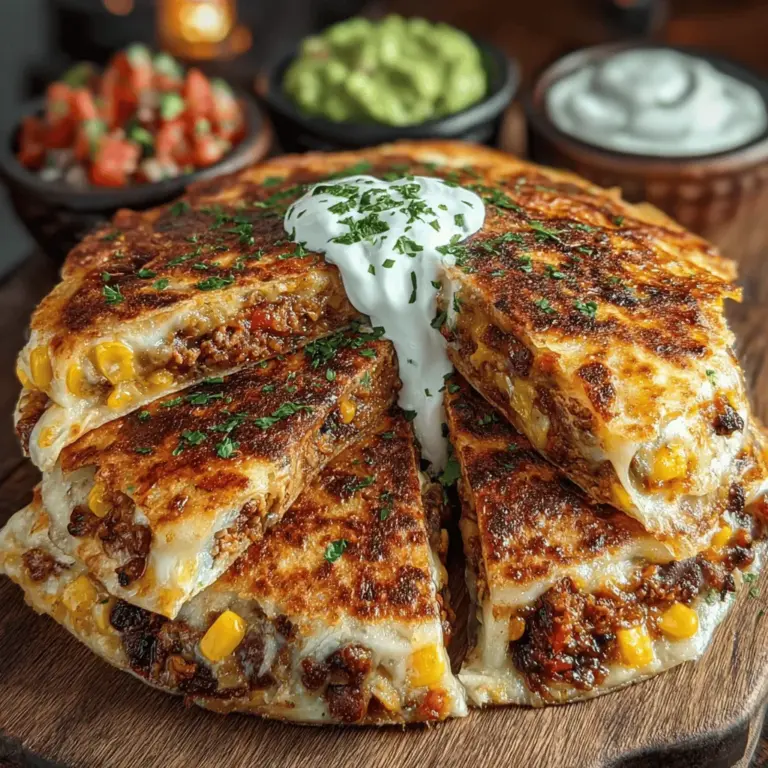
Slicing and Serving
Presenting Your Quesadilla
Now that you have a perfectly cooked quesadilla, it’s time to slice and serve it attractively.
Cutting Techniques: Best Practices for Slicing Quesadillas into Manageable Wedges
To slice your quesadilla, place it on a cutting board and let it cool for a minute. This resting period allows the cheese to set slightly, preventing it from spilling out when cut. Use a sharp pizza cutter or a knife to slice the quesadilla into wedges. A traditional method is to cut it into quarters, but feel free to adjust the size based on your serving preferences. For smaller hands or if serving to kids, cutting into smaller triangles makes it easier for them to handle.
Serving Suggestions: Ideas for Garnishing and Presenting with Dips Like Salsa, Guacamole, or Sour Cream
Presentation can elevate your quesadilla experience. Arrange the wedges on a plate and consider garnishing with fresh cilantro or a sprinkle of cheese on top for added flair. Serve alongside a small bowl of salsa, guacamole, or sour cream for dipping. These condiments not only enhance the flavor but also add a burst of color to your plate. For an extra touch, you can add a squeeze of lime over the quesadilla or sprinkle with chili flakes for those who enjoy a bit of heat.
Nutritional Information and Serving Suggestions
Understanding the Health Benefits
When it comes to family meals, the nutritional value of your ingredients is as important as the flavor.
Caloric Breakdown: An Overview of the Nutritional Content Per Serving
A serving of these quesadillas (one quarter) typically contains around 250-300 calories, depending on the specific fillings used. The whole wheat tortillas provide fiber, while the cheese adds protein and calcium. By incorporating vegetables like spinach, bell peppers, or mushrooms as fillings, you can increase the nutritional benefits, adding vitamins and minerals that are essential for growing kids. If you use lean proteins such as chicken or turkey, you can further enhance the protein content, making these quesadillas a well-rounded meal option.
Pairing Ideas: Suggestions for Side Dishes or Drinks That Complement the Quesadillas
To create a complete meal, consider serving your quesadillas with a fresh salad or some sautéed vegetables. A simple side of mixed greens drizzled with a light vinaigrette can add a refreshing contrast to the warm, cheesy quesadillas. For drinks, consider offering flavored water, iced tea, or even a light fruit smoothie to complement the flavors of the meal. These pairings not only enhance the overall dining experience but also ensure that your family receives a balanced meal.
Conclusion
Back To School Quesadillas are a fantastic way to provide your family with a quick, nutritious meal that doesn’t compromise on flavor. This recipe encapsulates the essence of easy cooking while catering to diverse dietary needs. With a little preparation and creativity, you can make mealtime enjoyable and satisfying for everyone. Embrace this recipe as a staple in your weekly meal planning, and watch as it becomes a beloved dish for kids and adults alike. Whether you’re preparing these quesadillas for a busy weeknight dinner or as a fun after-school snack, they are sure to please while fitting seamlessly into your family’s lifestyle. Enjoy the process of customizing them with different fillings, and watch your culinary skills grow as you experiment with flavors and ingredients!
