Introduction
In recent years, the popularity of vegan desserts has soared, capturing the hearts of both plant-based eaters and dessert lovers alike. Vegan desserts offer a delightful way to indulge without compromising dietary choices or health. Among the myriad of options available, one standout recipe is the decadent vegan chocolate peanut butter fudge. This treat is not only rich and satisfying but also embodies a perfect blend of flavors that tantalize the taste buds.
The appeal of this fudge lies not only in its deliciousness but also in its health benefits. Made with wholesome ingredients such as natural peanut butter, maple syrup, and coconut oil, this fudge is a guilt-free indulgence. Natural peanut butter provides a good source of protein and healthy fats, while maple syrup adds sweetness without the refined sugars found in many traditional desserts. Coconut oil contributes to the creaminess and richness of the fudge while offering medium-chain triglycerides that can support energy levels. Together, these ingredients create a fudge that is not just a treat but also a more nourishing option for your sweet tooth.
This recipe is incredibly easy to make, requiring no baking, making it the perfect dessert for any occasion—whether it’s a casual get-together, a holiday celebration, or a simple weeknight treat. With just a few simple steps, you can whip up a batch of this delicious fudge that will impress everyone around you.
Ingredients Breakdown
Before diving into the preparation steps, let’s take a closer look at each ingredient that plays a crucial role in this decadent vegan chocolate peanut butter fudge.
Natural Peanut Butter
Peanut butter is the star of this recipe, offering a creamy base that lends both flavor and texture. When selecting peanut butter, you can choose between smooth and crunchy varieties. Smooth peanut butter creates a velvety fudge, while crunchy peanut butter adds delightful texture with little peanut pieces throughout. The choice ultimately depends on your personal preference; both options will yield a delicious result.
Maple Syrup vs. Agave Nectar
For sweetness, this recipe calls for maple syrup, which brings a unique flavor profile that pairs beautifully with chocolate and peanut butter. Maple syrup is a natural sweetener packed with antioxidants and minerals, making it a healthier alternative to refined sugars. If you prefer, you can substitute maple syrup with agave nectar, which is also plant-based and has a milder flavor. However, maple syrup’s rich taste enhances the overall depth of the fudge.
Coconut Oil
Coconut oil is essential for achieving the right texture and richness in the fudge. When melted, it blends seamlessly with the other ingredients to create a creamy consistency. It’s important to use melted coconut oil in this recipe to ensure that the fudge sets properly in the refrigerator. Additionally, coconut oil is known for its health benefits, including supporting heart health and boosting metabolism.
Unsweetened Cocoa Powder
The use of unsweetened cocoa powder is key to obtaining a deep, rich chocolate flavor in the fudge. Unlike sweetened cocoa powders, unsweetened cocoa powder allows you to control the sweetness level of your fudge, complementing the flavors of the natural peanut butter and maple syrup. It is also rich in antioxidants, making this fudge not just a sweet treat but a potentially beneficial dessert option.
Pure Vanilla Extract
Vanilla extract is a must-have ingredient in many dessert recipes, and this fudge is no exception. It enhances the overall flavor profile, adding a warm, aromatic depth that elevates the fudge. Opt for pure vanilla extract for the best quality and flavor; artificial vanilla can lack the complexity that pure extract provides.
Sea Salt
While it may seem counterintuitive to add salt to a sweet recipe, a pinch of sea salt is crucial in balancing the sweetness of the fudge. It enhances the flavors and brings out the richness of the chocolate and peanut butter. The contrast between sweet and salty is what makes this fudge truly indulgent.
Dairy-Free Chocolate Chips (Optional)
For those who crave an extra chocolatey kick, adding dairy-free chocolate chips is a fantastic option. These chips melt beautifully and can be stirred into the fudge mixture or sprinkled on top for added texture. They are also a great way to satisfy chocolate cravings while maintaining a vegan-friendly recipe.
Chopped Nuts or Shredded Coconut (Optional)
To customize your fudge, consider adding toppings such as chopped nuts or shredded coconut. Chopped nuts—like almonds or walnuts—bring a delightful crunch, while shredded coconut adds a hint of tropical flavor. Both options not only enhance the visual appeal of the fudge but also contribute additional nutrients.
Preparation Steps
Now that you’re familiar with the ingredients, it’s time to get started on preparing this delicious fudge. Follow these step-by-step instructions to ensure a smooth and enjoyable cooking experience.
Step 1: Preparing the Baking Dish
Begin by preparing your baking dish. Line an 8-inch square baking pan with parchment paper, allowing some overhang on the sides. This overhang will make it easier to lift the fudge out of the pan once it has set. If you don’t have parchment paper, you can lightly grease the pan with a bit of coconut oil, but parchment paper is recommended for easier removal and cleaner edges.
Step 2: Mixing Wet Ingredients
In a medium-sized mixing bowl, combine the natural peanut butter, maple syrup, melted coconut oil, and pure vanilla extract. Use a whisk or spatula to mix these ingredients together until they are well combined and smooth. Make sure there are no lumps of peanut butter remaining; the mixture should be creamy and homogeneous. This step is crucial as it forms the base of your fudge.
Step 3: Adding the Dry Ingredients
Once the wet ingredients are well mixed, it’s time to incorporate the dry ingredients. Sift in the unsweetened cocoa powder and a pinch of sea salt. Stir until everything is fully integrated, ensuring there are no dry spots. The mixture should be thick and fudgy, indicating that you’ve achieved the right consistency.
Step 4: Optional Ingredients
If you’re using dairy-free chocolate chips, fold them into the fudge mixture at this point. You can also sprinkle in any optional toppings like chopped nuts or shredded coconut for added flavor and texture. Mix just until evenly distributed.
Step 5: Transferring to the Baking Dish
Pour the fudge mixture into the prepared baking dish, using a spatula to spread it evenly into the corners. Smooth the top with the spatula to create a level surface. If you’re feeling adventurous, you can sprinkle additional chocolate chips or toppings on top for a decorative touch.
Step 6: Refrigerating the Fudge
Cover the baking dish with plastic wrap or foil and place it in the refrigerator to set. Allow the fudge to chill for at least 2 hours, or until it is firm to the touch. The refrigeration process is essential for achieving that perfect fudge texture, allowing the flavors to meld beautifully.
By following these initial steps, you are well on your way to creating a decadent vegan chocolate peanut butter fudge that will delight your taste buds and impress your guests. Stay tuned for the next part of this article, where we will explore additional tips for achieving the best results and answer some common questions about this indulgent treat.
{{image_2}}
Combining Dry Ingredients
When making Decadent Vegan Chocolate Peanut Butter Fudge, it’s essential to combine your dry ingredients properly. Start by sifting together the cocoa powder, powdered sugar, and any other dry ingredients like almond flour or plant-based protein powder. Sifting serves a crucial purpose: it breaks up any clumps in the dry ingredients, ensuring a smoother texture in the final product. This step is especially important for cocoa powder, which can often clump together, leading to an uneven distribution of chocolate flavor throughout the fudge.
Merging Wet and Dry Mixtures
Once your dry ingredients are well combined, it’s time to merge them with your wet mixture. Begin by pouring the wet ingredients—typically consisting of creamy peanut butter, maple syrup, and a splash of vanilla extract—into a mixing bowl. Gradually add the sifted dry ingredients to the wet mixture, stirring continuously. To avoid clumps, use a spatula or a whisk to mix thoroughly. It’s best to start with a small amount of the dry mix, incorporating it fully before adding more. This technique not only helps in achieving a smooth batter but also ensures that the flavors meld beautifully, resulting in rich, creamy fudge.
Transferring to Baking Dish
After achieving a smooth, homogenous mixture, it’s time to transfer it to your prepared baking dish. For best results, choose a dish lined with parchment paper, allowing for easy removal later. Pour the fudge mixture into the dish and use a spatula to spread it evenly. Take care to press it down firmly but gently, ensuring an even spread. This step is crucial not just for aesthetics but also for even setting. An uneven layer might lead to parts of the fudge being overly soft or hard, which can affect the overall texture and experience.
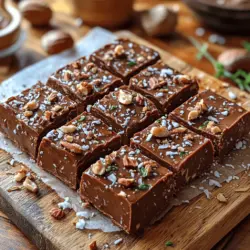
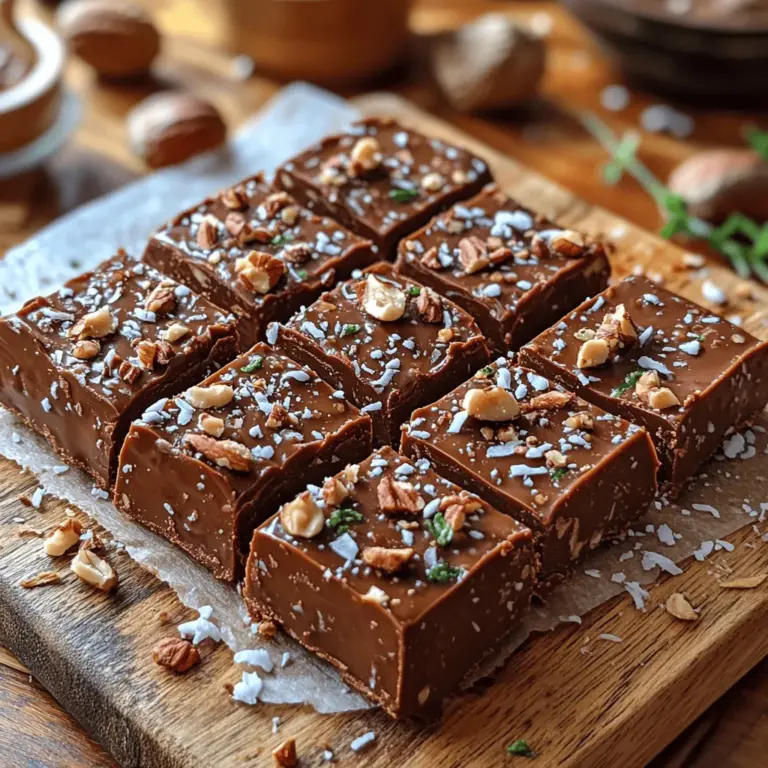
Adding Toppings
Enhancing your fudge with toppings can elevate its flavor and presentation. Consider adding chopped nuts, a sprinkle of sea salt, or a drizzle of melted dark chocolate on top before chilling. These additions not only contribute to a visually appealing finish but also introduce new flavors and textures that complement the rich chocolate and creamy peanut butter. For instance, a sprinkle of sea salt can balance the sweetness, while crushed nuts can add a satisfying crunch. Feel free to get creative—using toppings that resonate with your personal taste can make this fudge truly unique.
Chilling Process
Chilling your fudge is a crucial step that allows it to set properly. Once you’ve added your toppings, place the baking dish in the refrigerator for at least 2-3 hours, or until firm. This cooling period is vital because it helps the fudge achieve the right consistency. The fats from the peanut butter solidify, giving the fudge its characteristic rich and creamy texture. Avoid the temptation to rush this process; patience will reward you with a perfectly set fudge that holds its shape when cut.
Cutting and Serving
Once your fudge has chilled and set, it’s time to cut and serve. To achieve clean, beautiful squares, use a sharp knife dipped in warm water. Wipe the knife with a towel between cuts to maintain neat edges. Aim for bite-sized pieces, as the fudge is rich and satisfying. For an elegant presentation, arrange the pieces on a decorative platter. You might even consider garnishing with additional toppings or a light dusting of cocoa powder. This attention to detail will impress your guests and make your fudge the star of any gathering.
Nutritional Information
Understanding the nutritional aspects of this Decadent Vegan Chocolate Peanut Butter Fudge helps you appreciate its health benefits. Each serving typically contains around 100-150 calories, depending on the specific ingredients used. The fudge is rich in healthy fats from peanut butter, contributing to satiety and energy. While it does contain sugars, they come from natural sweeteners like maple syrup, which provide a more wholesome alternative to refined sugars.
Incorporating plant-based ingredients into your diet, like nut butters and cocoa, offers numerous health benefits. They are often rich in vitamins, minerals, and antioxidants, contributing to overall wellness. This fudge allows you to indulge without guilt, as it’s made with wholesome, plant-based components that promote a healthier lifestyle.
Serving Suggestions
To make your fudge truly memorable, consider creative serving ideas. Present the fudge on decorative platters, layering it with fresh fruits like strawberries or raspberries for a vibrant contrast. Drizzling melted chocolate or a peanut butter glaze over the top adds a touch of indulgence and enhances the visual appeal. For a delightful pairing, serve the fudge alongside a warm cup of herbal tea or coffee, which will beautifully complement the rich flavors of chocolate and peanut butter.
Storage Instructions
To ensure your Decadent Vegan Chocolate Peanut Butter Fudge remains fresh, store any leftovers in an airtight container in the refrigerator. Properly stored, the fudge can last up to two weeks, though it’s unlikely to last that long due to its irresistible taste! If you want to keep it for an extended period, consider freezing it. Cut the fudge into squares and wrap each piece in parchment paper before placing them in a freezer-safe container. When stored this way, the fudge can last up to three months. Just remember to thaw it in the refrigerator before serving for the best texture.
Conclusion
Making Decadent Vegan Chocolate Peanut Butter Fudge is not only easy but also incredibly rewarding. The process allows you to create a rich, indulgent treat that’s perfect for sharing with friends and family. The combination of chocolate and peanut butter in this fudge is simply irresistible. Whether you’re serving it at a gathering or enjoying it as a personal treat, this fudge is sure to delight.
Encouraging creativity in the kitchen, feel free to explore variations on this recipe. You might add different toppings, experiment with nut butters, or even incorporate spices like cinnamon for a unique twist. The joy of homemade fudge lies in its versatility, allowing you to personalize it to your preferences while indulging in a delicious vegan dessert. So gather your ingredients, and get ready to create a treat that everyone will love!