
When it comes to comfort food that pleases both kids and adults alike, chicken tenders reign supreme. Their tender, juicy interior and golden, crispy exterior make them a beloved choice for family dinners, parties, and even casual snacks. However, while traditional frying methods can yield delicious results, they often come with added calories and unhealthy fats. This is where our Crispy Oven-Baked Chicken Tenders with Honey Mustard come into play, offering a healthier alternative without sacrificing flavor.
Oven-baked chicken tenders provide a guilt-free way to enjoy this classic dish. By using the oven instead of a deep fryer, you can significantly reduce the amount of oil needed, resulting in a lighter meal that still delivers on taste and texture. As a family-friendly recipe, it’s perfect for busy weeknights or gatherings, especially when paired with a zesty honey mustard dipping sauce that elevates the dish to new heights.
The Allure of Chicken Tenders
Chicken tenders have carved out a special place in the culinary landscape across various cuisines. From American fast food chains to international variations, they have become a staple for good reason. Their appeal lies in their versatility; whether served as an appetizer, main dish, or even a party platter, chicken tenders can be enjoyed in countless ways. They can be paired with a variety of sauces, served alongside salads, or tucked into wraps, making them a flexible option for any meal.
Moreover, their mild flavor and tender texture make them especially popular among children, who often shy away from more complex flavors. Adults, too, appreciate the simplicity and satisfaction of a well-prepared chicken tender. This universal appeal makes chicken tenders a go-to choice for family meals or gatherings, ensuring that everyone at the table leaves satisfied.
Why Choose Oven-Baked Over Fried?
The decision to bake rather than fry your chicken tenders comes with a plethora of health benefits. First and foremost, oven-baking drastically reduces the amount of oil used in the cooking process. This means fewer calories and less saturated fat, making it easier to enjoy your favorite foods without the guilt. For health-conscious individuals or families aiming to eat better, oven-baked chicken tenders present a winning solution.
In addition to being healthier, oven-baked chicken tenders can maintain their flavor and crispiness when prepared correctly. The key lies in achieving the right temperature and using the right ingredients. A well-preheated oven ensures that the chicken cooks evenly and the coating becomes golden and crispy. Furthermore, the convenience of cooking in the oven streamlines the process, making it easier to prepare a meal while allowing for a quick cleanup afterward.
Ingredients Breakdown
Creating the perfect crispy oven-baked chicken tenders begins with selecting high-quality ingredients. Here’s a breakdown of what you’ll need for this recipe:
Boneless, Skinless Chicken Breasts
The star of this dish is the boneless, skinless chicken breast. This lean protein is not only low in calories but also incredibly versatile. When preparing the chicken, ensure that you cut it into uniform strips to promote even cooking. A good tip is to slightly freeze the chicken for about 30 minutes before slicing. This makes it easier to cut cleanly and results in more consistent sizes for cooking.
Seasoning Blend
Flavor is crucial when it comes to chicken tenders. A well-balanced seasoning blend enhances the taste and complements the crispy coating. Common seasonings include garlic powder, onion powder, paprika, salt, and pepper. Feel free to get creative with your spice choices. You can add herbs like oregano or thyme for a more aromatic profile or even a pinch of cayenne pepper for a kick.
Panko Breadcrumbs
For that irresistible crunch, panko breadcrumbs are the way to go. Unlike regular breadcrumbs, panko is flakier and larger, which creates a more textured coating. This unique structure allows for greater crispiness and a more satisfying bite. If you prefer a different texture, you can mix panko with crushed cornflakes or even ground nuts for an interesting twist.
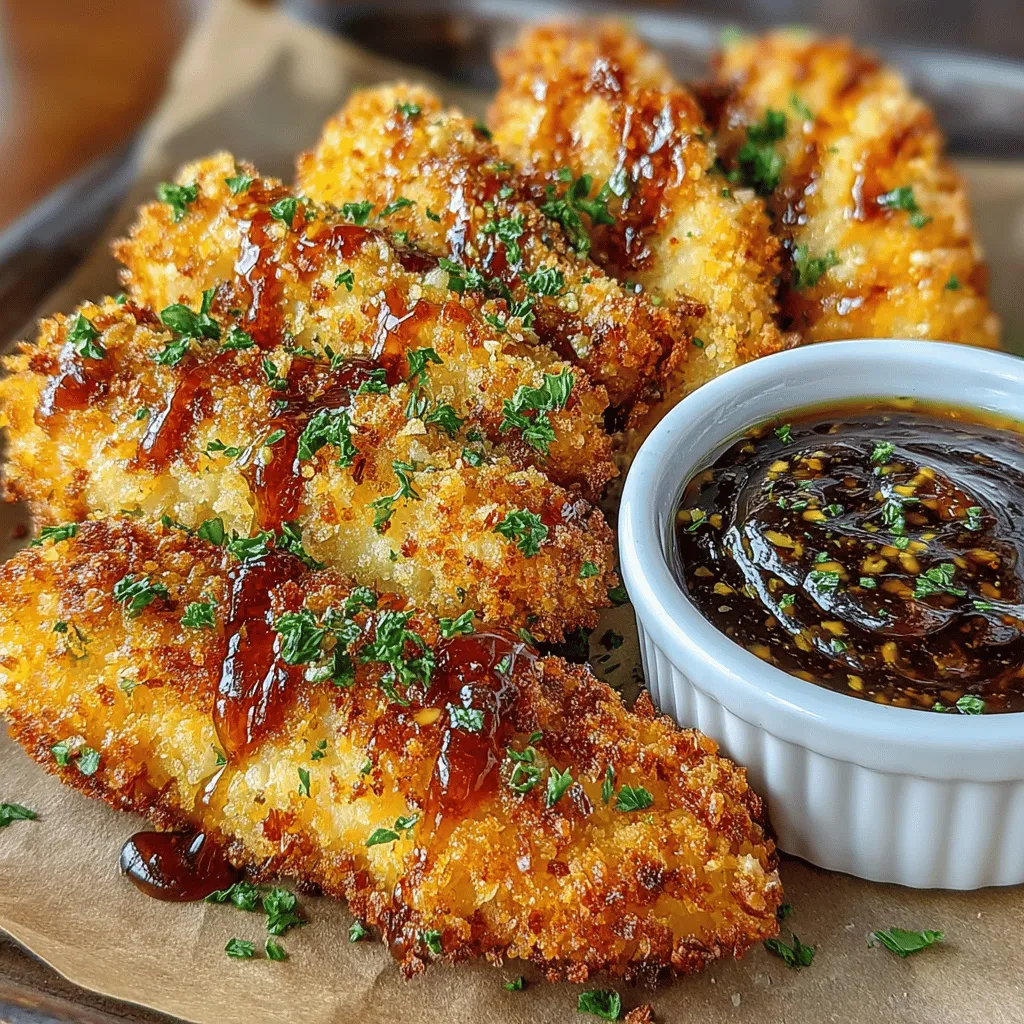
Honey Mustard Dipping Sauce
No chicken tender experience is complete without a delicious dipping sauce. Our honey mustard sauce combines the sweetness of honey with the tanginess of Dijon mustard, creating a perfect balance of flavors. To make the sauce, you’ll need:
– Mayonnaise: Adds creaminess and helps to temper the sharpness of the mustard.
– Dijon Mustard: Offers a robust flavor that cuts through the richness of the chicken.
– Honey: Provides natural sweetness and enhances the overall flavor profile.
– Apple Cider Vinegar: Adds acidity and brightness, helping to round out the sauce.
Each of these ingredients contributes to a sauce that is not only delicious but also easy to whip up in just a few minutes.
Step-by-Step Instructions for Crispy Oven-Baked Chicken Tenders
Now that you have an understanding of the ingredients, let’s dive into the step-by-step process for making these crispy oven-baked chicken tenders.
Preheat the Oven
The first step in achieving perfectly crispy chicken tenders is to preheat your oven. Set it to 425°F (220°C). The high temperature is crucial for ensuring that the tenders cook evenly and develop that sought-after crispy texture. While the oven is heating up, you can prepare the chicken and the breading station.
Setting Up the Breading Station
Creating a breading station is essential for achieving a nice coating on your chicken tenders. This typically involves three shallow dishes: one for the seasoned flour, one for the beaten eggs, and one for the panko breadcrumbs. Here’s how to set it up:
1. Flour Mixture: In the first dish, combine all-purpose flour with your chosen seasonings. Mix well to ensure the chicken will be evenly coated with flavor.
2. Egg Wash: In the second dish, beat a couple of eggs until they are smooth. This will help the breadcrumbs adhere to the chicken.
3. Panko Coating: In the third dish, place the panko breadcrumbs. If you want to enhance the flavor further, consider adding some extra seasoning to the breadcrumbs as well.
With your breading station set up, you are now ready to coat the chicken tenders and get them in the oven for a deliciously crispy finish.
Stay tuned for the next part of this article, where we will continue with the detailed steps to cook the chicken tenders to perfection and serve them with the delightful honey mustard dipping sauce.
The Three-Bowl Method: Achieving the Perfect Coating
To create irresistibly crispy oven-baked chicken tenders, mastering the three-bowl method is crucial. This technique allows for a systematic breading process, ensuring each chicken strip is evenly coated for a delightful crunch. Here’s how it works:
1. Bowl One: Flour Mixture – In the first bowl, combine all-purpose flour with seasonings like salt, black pepper, garlic powder, and paprika. This mixture will act as the first layer of flavor and will help the egg adhere to the chicken.
2. Bowl Two: Egg Wash – In the second bowl, whisk together eggs and a splash of milk. This egg wash will serve as the glue that binds the flour and breadcrumb coatings to the chicken tenders.
3. Bowl Three: Breadcrumb Coating – In the third bowl, mix panko breadcrumbs with additional seasonings, such as Italian herbs or grated Parmesan cheese for extra flavor. The panko breadcrumbs create a light, crispy texture that sets these chicken tenders apart.
Tips for Ensuring Even Coating of Chicken Strips
To achieve an even and thorough coating on your chicken tenders, follow these tips:
– Dry the Chicken: Pat the chicken strips dry with paper towels before coating. This helps the flour mixture stick better and prevents sogginess.
– Work in Batches: Instead of coating all the chicken strips at once, work in smaller batches. This ensures that each piece receives adequate coverage without overcrowding the bowls.
– Use Tongs: For a neater process, use tongs to transfer the chicken strips from one bowl to another. This minimizes mess and helps you maintain a clean work area.
Coating the Chicken Tenders
Once you have your chicken strips ready, it’s time to coat them using the three-bowl method. Here’s a detailed breakdown of the process:
1. First Dip: Start by dredging a chicken strip in the flour mixture, ensuring it’s fully coated. Shake off any excess flour, as too much can lead to a clumpy coating.
2. Egg Wash: Next, dip the floured chicken strip into the egg wash, allowing any excess liquid to drip back into the bowl.
3. Final Coating: Finally, transfer the chicken strip to the bowl of breadcrumbs. Press down gently to ensure that the breadcrumbs adhere well to the chicken. This step is crucial for achieving that desired crunch.
The Importance of Shaking Off Excess Flour and Egg
Shaking off excess flour and egg is essential for a successful breading process. Excess flour can lead to a heavy, overly thick coating, while excess egg can make the breading soggy. Ensuring that each chicken strip is lightly coated will yield a crispier texture once baked.
Techniques for Pressing Breadcrumbs onto Chicken
When coating the chicken tenders, the technique used to press the breadcrumbs into the chicken can make a significant difference:
– Press and Roll: After placing the chicken strip in the breadcrumbs, gently press down and roll the strip within the breadcrumbs. This helps create a more uniform layer of coating.
– Use a Fork: If you find your fingers getting too messy, use a fork to turn the chicken in the breadcrumb bowl. This can help ensure an even coat without the mess.
The Baking Process
Now that your chicken tenders are coated, it’s time to bake them to perfection:
Arranging on the Baking Sheet for Optimal Cooking
1. Prepare the Baking Sheet: Line a baking sheet with parchment paper or aluminum foil for easy cleanup. For optimal crispiness, consider using a wire rack placed on top of the baking sheet. This allows hot air to circulate around the chicken, ensuring even cooking.
2. Spacing the Tenders: Place the coated chicken tenders on the prepared sheet, ensuring they are spaced apart. Avoid overcrowding, as this can trap steam and prevent crispiness.
The Significance of Cooking Spray for Crispiness
To achieve that golden, crispy exterior, lightly spray the tops of the chicken tenders with cooking spray or brush them with a little olive oil. This helps promote browning and enhances the overall texture.
Monitoring Cooking Time and Internal Temperature for Safety
Bake the chicken tenders in a preheated oven at 425°F (220°C) for approximately 20-25 minutes, flipping them halfway through the cooking time. To ensure they are fully cooked, use a meat thermometer to check that the internal temperature reaches 165°F (74°C). This step not only ensures food safety but also guarantees juicy, tender chicken.
Making the Honey Mustard Dipping Sauce
While the chicken tenders are baking, you can prepare the delicious honey mustard dipping sauce. This sauce complements the crispy chicken perfectly, adding a sweet and tangy element to every bite.
Step-by-Step Preparation of the Sauce
1. Gather Ingredients: You will need 1/2 cup of mayonnaise, 1/4 cup of honey, 2 tablespoons of Dijon mustard, and a squeeze of lemon juice for brightness.
2. Mixing the Sauce: In a medium bowl, combine the mayonnaise, honey, Dijon mustard, and lemon juice. Whisk until smooth and well combined. Taste and adjust the flavors according to your preference; add more honey for sweetness or more mustard for a tangier kick.
3. Chill Before Serving: For the best flavor, refrigerate the sauce for at least 30 minutes before serving. This allows the flavors to meld together beautifully.
Suggestions for Adjusting Flavors Based on Personal Preference
Feel free to customize the honey mustard sauce to suit your tastes. For a spicier kick, add a dash of hot sauce or cayenne pepper. If you prefer a creamier texture, incorporate Greek yogurt instead of mayonnaise. Experimenting with different flavor profiles can make this dipping sauce your own!
Serving Suggestions and Presentation Tips
Once your chicken tenders are ready and the honey mustard sauce is prepared, it’s time to serve this delightful dish:
Ideas for Garnishing the Dish
To enhance the visual appeal of your chicken tenders, consider garnishing with:
– Fresh Parsley: Finely chop fresh parsley and sprinkle it over the tenders for a pop of color and freshness.
– Sesame Seeds: Toasted sesame seeds can add an extra layer of flavor and a delightful crunch.
Creative Serving Options
– Platter Presentation: Serve the chicken tenders on a large platter, arranging them in an appealing pattern. Place a small bowl of honey mustard sauce in the center for easy dipping.
– Individual Bowls: For a fun presentation, consider serving chicken tenders in individual bowls with a small portion of dipping sauce for each guest.
Pairing Suggestions
To create a well-rounded meal, consider pairing your crispy oven-baked chicken tenders with:
– Side Dishes: Classic options include coleslaw, sweet potato fries, or a fresh garden salad. These sides complement the chicken’s flavors while adding variety to the meal.
– Beverages: Crisp white wines like Sauvignon Blanc or refreshing iced tea are excellent beverage options to accompany this dish. For a non-alcoholic choice, consider lemonade or sparkling water with a splash of fruit juice.
Nutritional Information
Enjoying crispy oven-baked chicken tenders can be both delicious and nutritious. Here’s an overview of the nutritional benefits:
Overview of Nutritional Benefits
Chicken is an excellent source of protein, which is essential for muscle growth and repair. Using whole, fresh ingredients in the recipe allows you to control the amount of sodium and fat, making this dish a healthier choice compared to fried alternatives.
Caloric Breakdown per Serving
On average, one serving of these crispy chicken tenders (approximately three tenders) contains around 350 calories. This calculation is based on the ingredients used, making it a satisfying yet guilt-free option.
Healthier Alternatives for Specific Dietary Needs
– Gluten-Free: Substitute all-purpose flour with gluten-free flour and use gluten-free breadcrumbs to make this dish suitable for those with gluten sensitivities.
– Low-Carb: For a lower-carb version, consider using crushed pork rinds or almond flour in place of breadcrumbs.
Conclusion
Crispy oven-baked chicken tenders with honey mustard offer a delightful combination of flavor, texture, and nutrition. These tenders are not only easy to prepare but also provide a healthier alternative to traditional fried chicken, making them perfect for family dinners or gatherings with friends.
Encourage your loved ones to try this recipe; they will appreciate the crispy texture and the delicious honey mustard dipping sauce that elevates the dish. With just a few simple steps, you can create a meal that is both enjoyable and satisfying, perfect for any occasion. So, roll up your sleeves, gather your ingredients, and get ready to savor the deliciousness of homemade chicken tenders!